OSLO - Landscape Lens - Comatic Aberration
Scott Prahl
Sep 2019, Version 1
This expands on one of the official OSLO tutorials with particular emphasis on comatic aberration. I do try to add context (and opinion) that I felt was missing from the original tutorial.
%matplotlib inline
import numpy as np
import matplotlib.pyplot as plt

def TSA(n, R1, R2, z_object, h):
    """Transverse Spherical Aberration for a thin lens (Conrady)"""
    phi = (n-1)*(1/R1-1/R2)
    z_paraxial = 1/(1/z_object+phi)
    c1 = 1/R1
    v = 1/z_object
    c = 1/R1-1/R2
    G1 = n**2*(n-1)/2
    G2 = (2*n+1)*(n-1)/2
    G3 = (3*n+1)*(n-1)/2
    G4 = (n+2)*(n-1)/2/n
    G5 = 2*(n**2-1)/n
    G6 = (3*n+2)*(n-1)/2/n
    s1 = G1*c*c*c - G2*c*c*c1 + G3*c*c*v
    s1 += G4*c*c1*c1 - G5*c*c1*v + G6*c*v*v
    return -h**3 * z_paraxial * s1

def SCOMA(n, R1, R2, z_object, h, H):
    """Sagittal Coma for a thin lens (Conrady)"""
    v = 1/z_object
    c1 = 1/R1
    c = 1/R1-1/R2
    G5 = (n**2-1)/(2*n)
    G7 = (2*n+1)*(n-1)/(2*n)
    G8 = n*(n-1)/2
    total = G5 * c * c1 - G7 * c * v - G8 * c * c
    return -H * h**2 * total

def natural_stop(n_lens, R1, R2, z_object):
    """
    Natural stop position to eliminate coma in a thin lens
    """
    phi = (n-1)*(1/R1-1/R2)
    tsa = TSA(n_lens, R1, R2, z_object, 1)
    coma = SCOMA(n_lens, R1, R2, z_object, 1, 1)
    Qp = coma / tsa
    stop_position = Qp/(phi + (1+Qp)/z_object)
    if stop_position > 0:
        return 1/(1/stop_position + phi)
    return stop_position
Overview
This is the fourth tutorial that covers OSLO basics. In this tutorial, we will use OSLO to bend a lens to minimize comatic aberration while maintaining a specific focal length.
The FAQ may give you a hint or two that will make the OSLO experience a bit less horrible.
The first part should have gotten you to the point of entering most of the lens data into the
Surface Dataspreadsheet.This second part explains how to set the size of the object and select rays to be traced.
This third part explains how use OSLO to automatically change surface curvature to achieve the desired effective focal length.
This tutorial is one from a list of other tutorials that are available.
New ideas
Why coma is bad
Using a standard optical glass N-BK7
Eliminating coma in thin lens using index of refraction
Eliminating coma in your lens using an aperture stop
Our goal is to develop a cheap singlet with a focal length of 100mm and a field-of-view of ±20°
Comatic Aberration or Coma
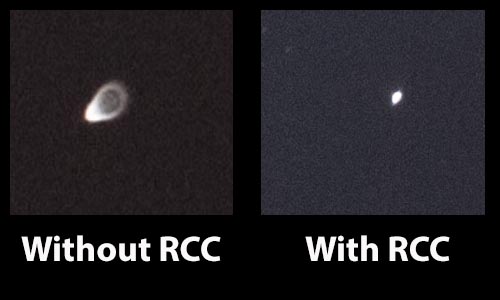
Coma is not present on axis, but appears as you move off-axis. The image below shows images of a star with and without comatic aberration. The blur size from coma varies as the square of the F/#, so it is highly dependent on entrance pupil diameter.
Coma is one of the third-order aberrations. As seen above, it looks a bit like a comet.
Conrady writes in his classic text Applied Physics and Optical Design:
The want of symmetry in the coma image is its worst feature; it causes a point of light to be rendered as a comet-like smudge with a strong concentration of light near the principal ray and a gradual fading away towards the broad tail of the figure. Such a caricature of what should be a small round dot is not only extremely unsightly in ordinary visual observations or in photographs, but also renders exact measurements quite impossible, as it is difficult to decide which part of such an unsymmetrical patch should be regarded as the location of the mean image-point. For that reason coma has been looked upon as the worst of all the aberrations from the earliest days of practical optics, and even in the days of pure empiricism its removal to the utmost practicable extent was regarded as imperative. The beginner will be wise if he accepts this result of long experience and declares relentless war against any easily visible residue of coma. This attitude finds additional justification in the fact that coma is more easily corrected — or at least rendered almost invisible — than any other aberration, and that in the great majority of cases its removal has a strong tendency to reduce other aberrations.
Yet another reason that coma is evil is because a decentered lens will produce coma. Typically, one adjusts the lens so that comets disappear during alignment. However, when there is intrinsic third-order coma then no position of the lens produces a nice symmetric spot.
Minimizing Coma
There are basically four things in the simple landscape lens that can be modified:
- The index of refraction $n$
- The curvature of the front surface $R_1$
- The curvature of the back surface $R_2$
- The position of the stop
Modifying the Index of refraction
Since we want the lens to be cheap, we are kind of stuck with N-BK7 glass. However if this was not the case, we could use the property that a thin lens will obey the sine condition or have zero coma when (Monk, Light Principles and Experiments, 1937)
$$ (2n + 1 ) (n - 1)/q+ ( n + 1 ) p = 0, $$where $n$ is the refractive index of the lens and the variables $p$ and $q$ are the Coddington shape and position variables
$$ q = \frac{R_2+R_1}{R_2-R_1} \qquad \mbox{and} \qquad p = \frac{z'+z}{z'-z} $$Here, $R_1$ and $R_2$ are the radii of curvature of the lens. The values $z$ and $z'$ are the object and image distances. For our example, a plano-convex lens with the object is at (minus) infinity,
$$ q=1 \qquad \mbox{and} \qquad p=-1. $$Therefore
$$ n^2-n-1 = 0 \qquad \mbox{or} \qquad n = \frac{1+\sqrt{5}}{2}\approx 1.618 $$Now looking at the LaCroix Precision Optical spreadsheet we see that there is a relatively cheap flint glass (only 1.6X the price of N-BK7) available named F2 with an index of refraction of 1.62 in the green. Unfortunately, this glass has significantly higher dispersion and therefore the chromatic aberrations will be much larger than for crown glass.
Nevertheless, let's test this analysis with OSLO!
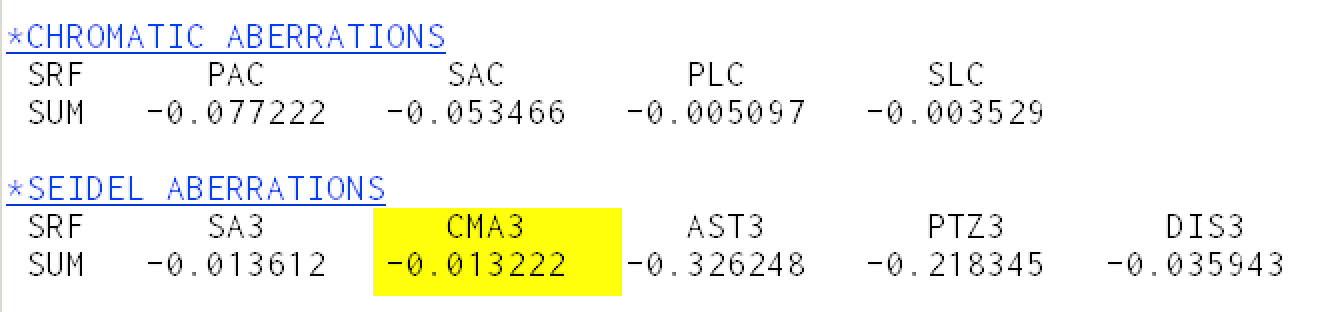
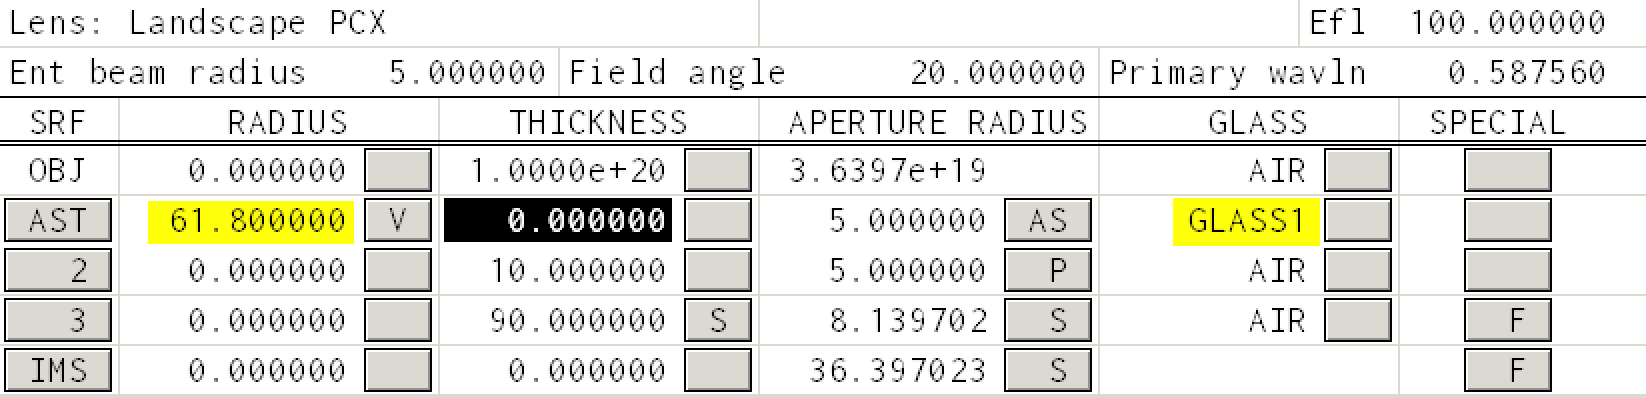
Case I, Our current lens
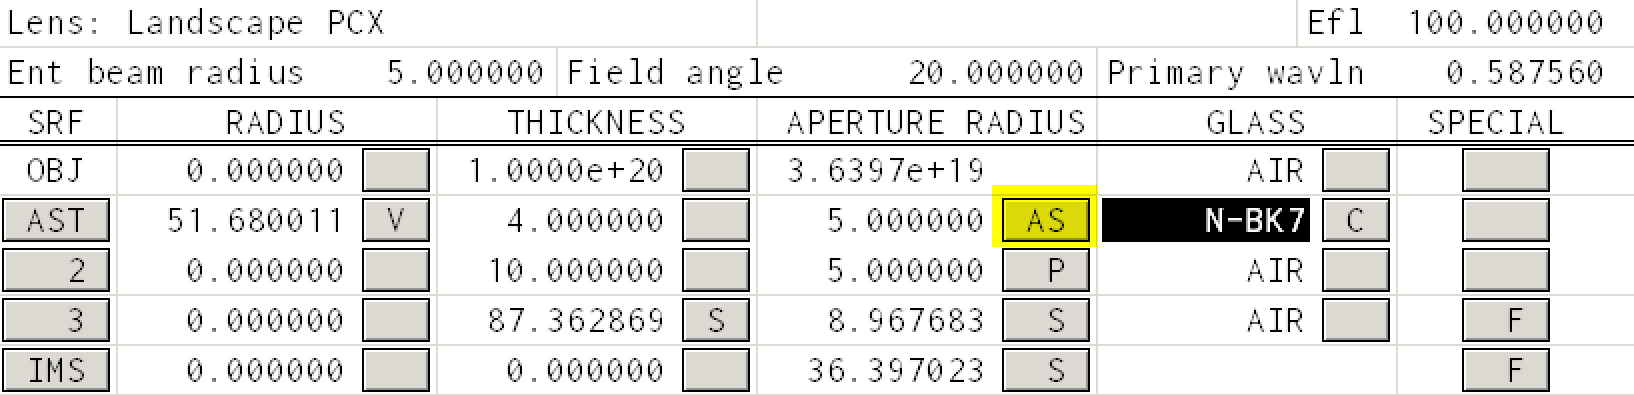
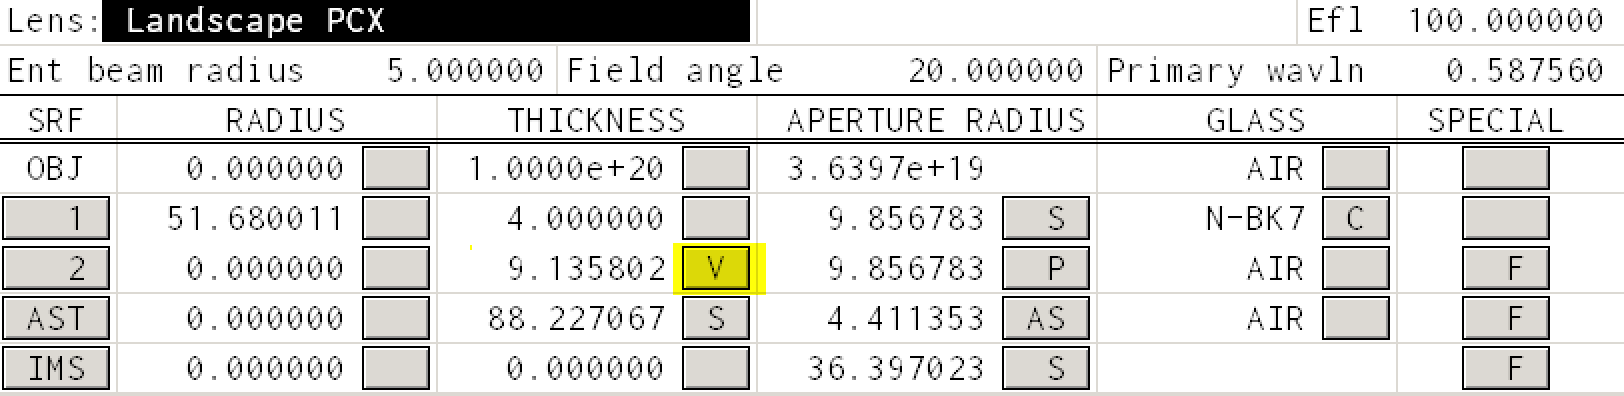
This is what the lens spreadsheet should look like (note that the first surface is now the aperture stop)
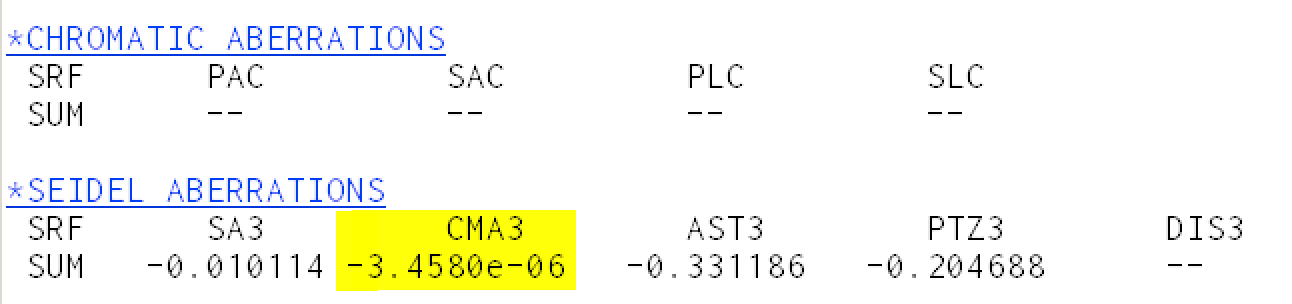
Coma is accessed through the Abr menu item in the TW 1 window. Press that and you should see
You can access the refractive index of N-BK7 using the Rin menu item in the TW 1 window. Press that and you should see

The RN1 column corresponds to refractive index at the mercury d-line (587.56nm). For surface 1, the index at this wavelength of N-BK7 at this wavelength is 1.5168.
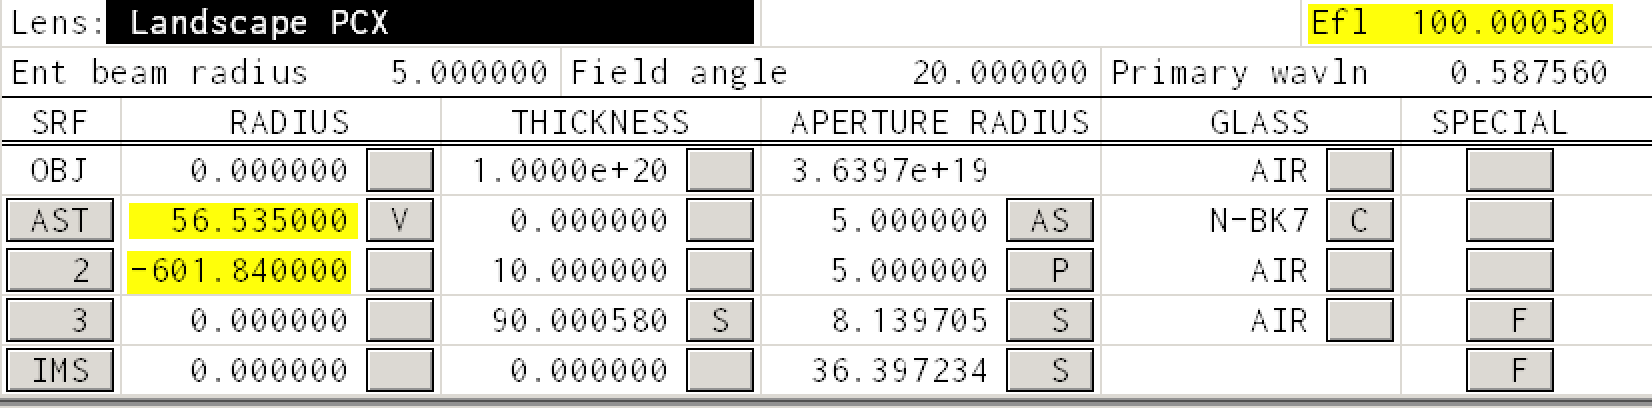
Case II, Using flint glass
Choose glass F2 from the Schott catalog, or just type "F2" into the glass square. To be fair, you need to change the radius of curvature of the first surface so that the focal length of the lens remains 100mm. You can do this by setting an error function (as described in the previous unit) and selecting "iterate" or you can just type the new radius in.

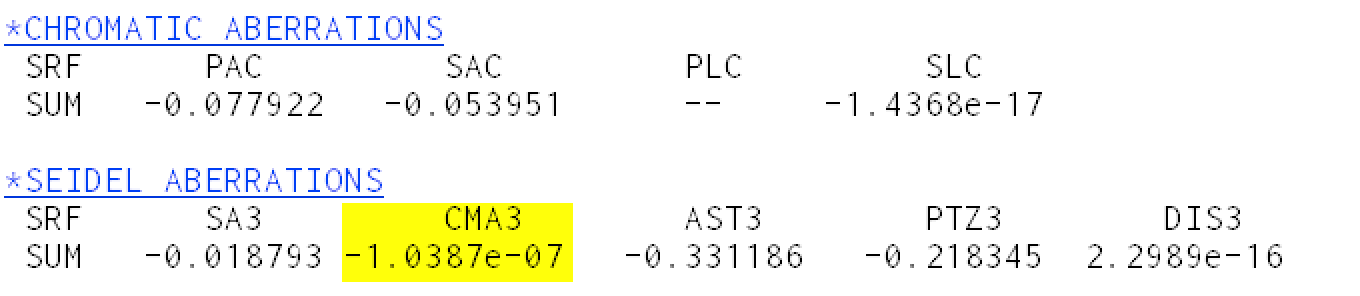
Again coma is accessed through the Abr menu item in the TW 1 window. Press that and you should see
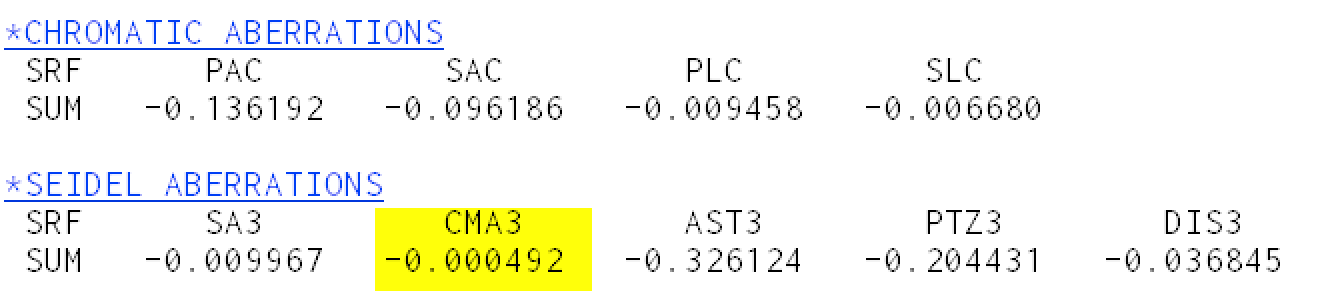
The coma is 25X smaller than for N-BK7! However, the coma is not zero! Read the next section for an explanation.
However, if you look at the Chromatic Aberrations, the PAC or "Primary Axial Color" aberration has increased by a factor of two because of the increased dispersion of flint glass compared to crown glass.
You can access the refractive index through the Rin menu item in the TW 1 window. Press that and you should see

And we see that the index of refraction for flint glass F2 is not quite 1.618
Case III, thin lens
To mimic the case that we did analytically, we made three assumptions
The index was 1.618. Note that F2 has an index of 1.620. So set the index of refraction
Direct...for all three wavelengths to 1.618The thickness should be zero. Just type zero for the thickness of the first surface
The radius of curvature of the first surface should be set so f=100mm.
Again coma is accessed through the Abr menu item in the TW 1 window. Press that and you should see
Looks great. The theory worked!
Bending the lens
Bending means changing the front and back radii of curvature so that the focal length remains the same. We sort of did when we modified the index of refraction and first surface radius of curvature above. This time we will keep the glass fixed as N-BK7.
If we go back to the equation for zero coma, we see that if $n$ and $p$ are fixed, then we can solve for the shape parameter $q$
$$ (2n + 1 ) (n - 1)/q+ ( n + 1 ) p = 0, $$since the position factor $p=-1$, we can get an expression for the shape factor
$$ q = \frac{(2n+1)(n-1)}{n+1} $$The radii of curvature are related to the shape factor and focal length by
$$ R_1 = \frac{2f(n-1)}{1+q}\qquad\mbox{and}\qquad R_2 = -\frac{2f(n-1)}{1-q} $$This is easily verified by substituting into the lensmaker's equation for a thin lens
$$ \frac{1}{f} = (n-1)\left(\frac{1}{R_1}-\frac{1}{R_2}\right) = (n-1)\left(\frac{1+q}{2f(n-1)}+\frac{1-q}{2f(n-1)}\right) = \frac{1}{f} $$Since we know both $n$ and $f$, this means that we can calculate the desired radii of curvature
f = 100
n = 1.5168
q = (2*n+1)*(n-1)/(n+1)
R_1 = 2*f*(n-1)/(1+q)
R_2 = -2*f*(n-1)/(1-q)

print("The shape factor is %.4f" % q)
print("The first  surface curvature is %8.3f mm" % R_1)
print("The second surface curvature is %8.3f mm" % R_2)
These are the curvatures needed to have zero coma. We can test this with OSLO
Notice that the focal length remains 100.
The coma is accessed through the Abr menu item in the TW 1 window.
and the coma has become zero as expected. (Of course it will be non-zero if we have a non-zero thickness for our lens.)
Moving the aperture (stop shift)
We have effectively eliminated coma for a thin lens by bending the lens. It turns out that there is another way to eliminate coma --- by introducing a stop.
Bently writes in the Field Guide to Lens Design
For a thin lens with non-zero spherical aberration, there is always a stop position that exactly eliminates coma (it also minimizes the tangential field curvature). This position is called the natural stop position.
Now this explains why we added surface 3 to our landscape lens in the first place. In this section we will revert to the PCX lens and move the aperture stop.
If the stop is in front of the lens
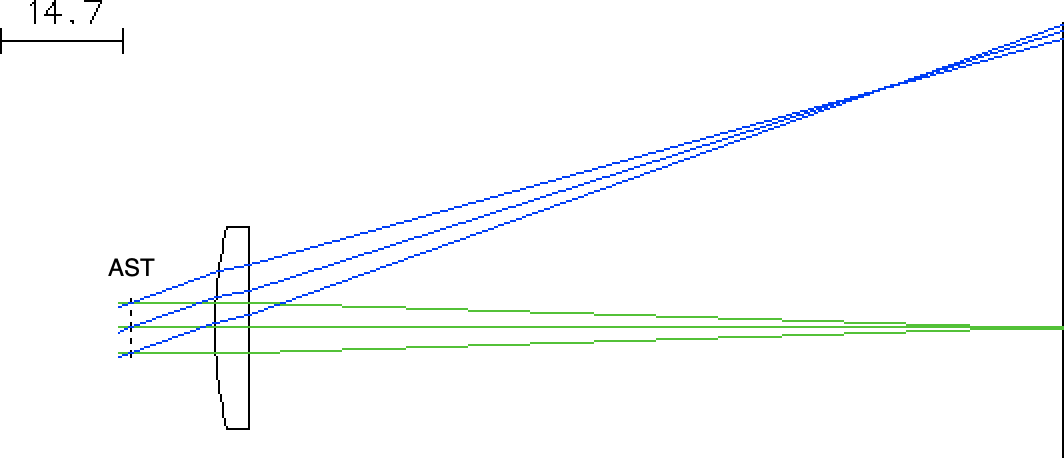
Then we can see that a slightly larger fan of rays pass through the glass than when the same size aperture stop is on the other side
Analytic Stop Shift
Not surprisingly, there is a formula for the location of the natural aperture stop for a thin lens. The stop shift needed to move the aperture from the lens to the location of the natural aperture stop is $$ Q = - \frac{\mbox{coma}}{\mbox{spherical aberration} $$ The distance needed to be moved is just $f\cdot Q$ (if the stop is in front of the lens and the object is infinitely far away). The calculation is slightly more involved if the object is at a finite distance or the stop shift is after the lens. All these calculations are captured in the routines at the top of this document.
n       = 1.517
R1      = 51.68   # mm
R2      = -np.inf # mm
z_object= -np.inf # mm

stop = natural_stop(n, R1, R2, z_object)
print("Best location for stop is %.2f mm from lens" % stop)
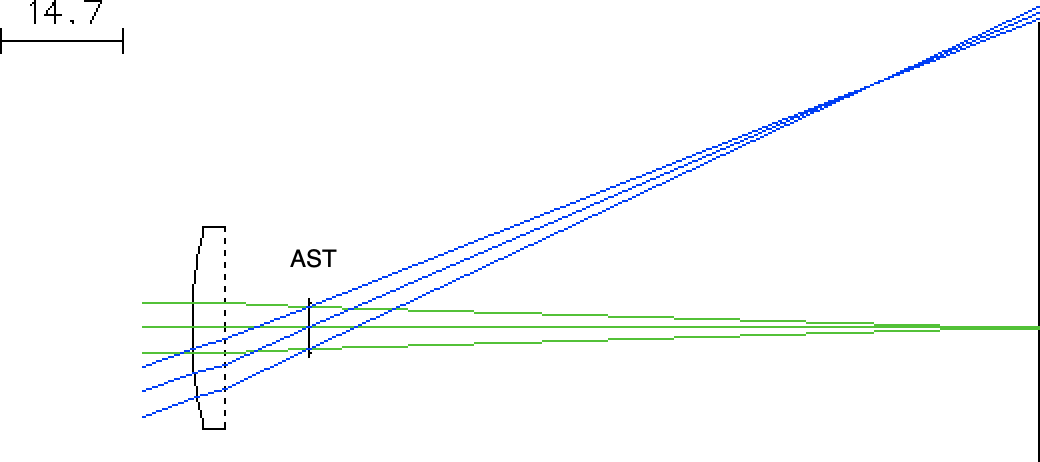
Make sure that the third row is marked as the AST (aperture stop).
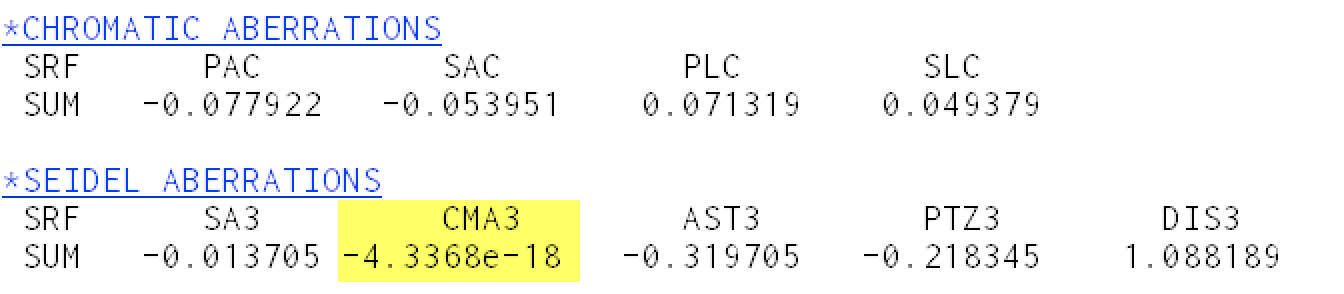
If we move the aperture stop to 11.15 mm after the second surface (using the THICKNESS column for the second surface), you'll see that we have effectively removed the coma (using the Abr menu item in the TW 1 window).
Stop Shift using OSLO
Recall that need to do three things to get OSLO to optimize
- tell OSLO what can be varied
- tell OSLO what error should be minimized
- tell OSLO to iterate
The parameter to be varied
The first is easy. Remove variability from the curvature and mark the thickness of the second surface as variable
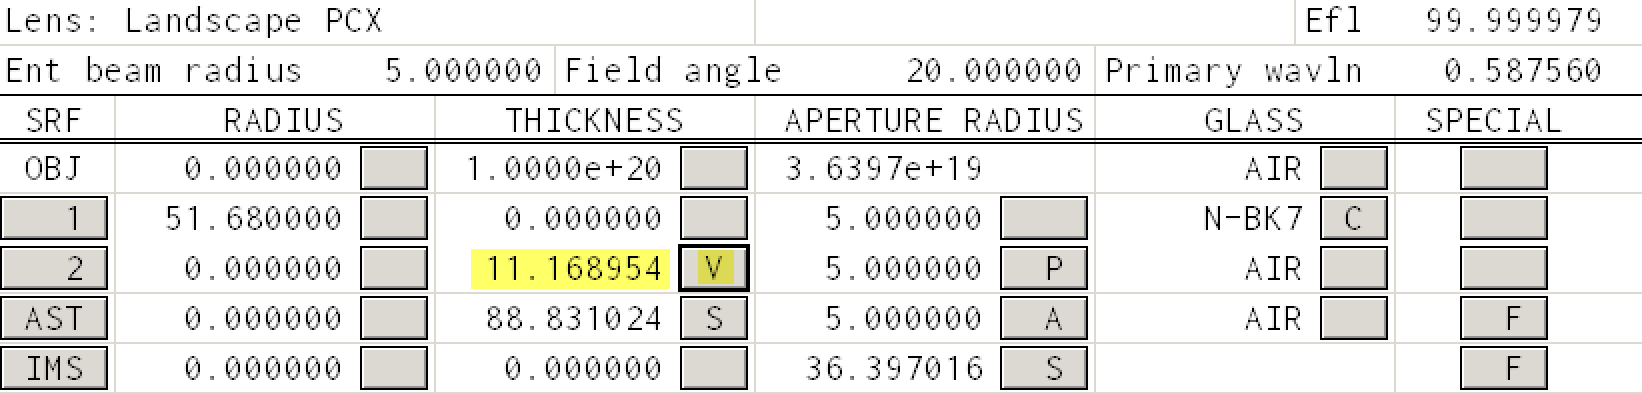
The 11.169 number will be 10.000 initially.
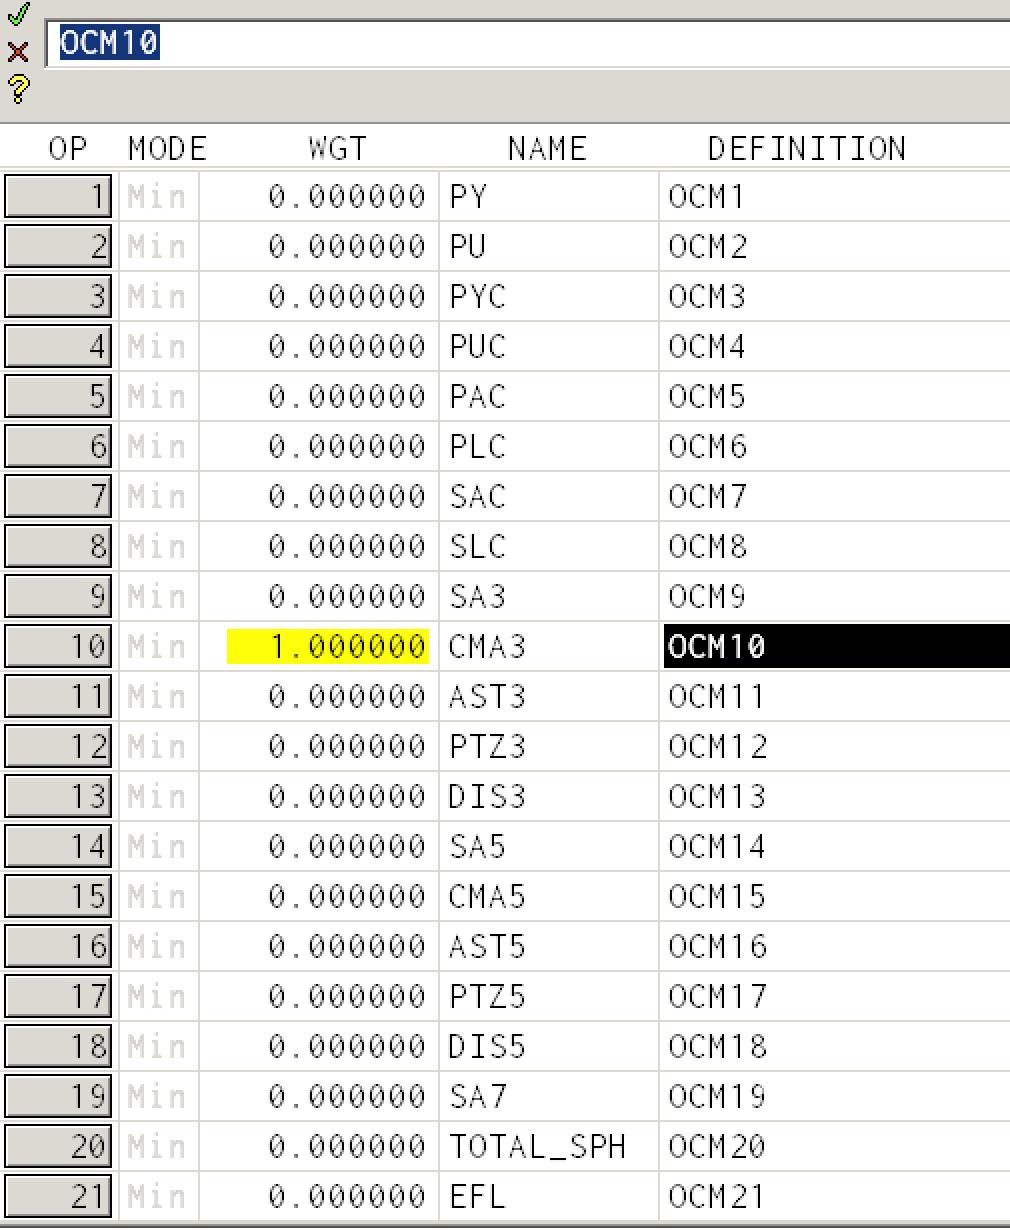
Defining the error
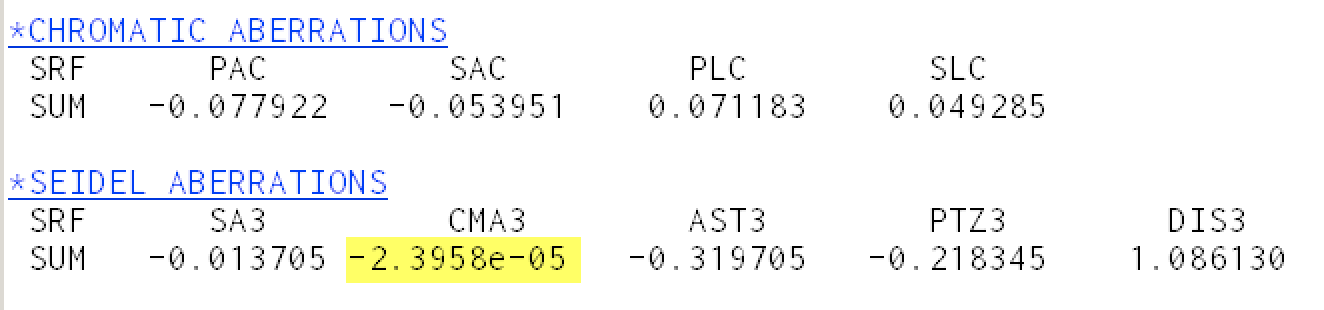
Defining the error can be an elaborate process. However, we just want OSLO to minimize the coma (CMA3). To do this we select the menu item
Optimize -> Generate Error Function -> Aberration Operands
and change the weight of the CMA3 entry (i.e., just minimize coma)
Iterating (finding the natural stop for a thin lens)
Set the THICKNESS to 0mm for the first surface
Select the menu item
Optimize -> Iterate
and click OK.
Which is remarkably close to our analytic estimate of 11.15 mm. OSLO calculates the coma to be
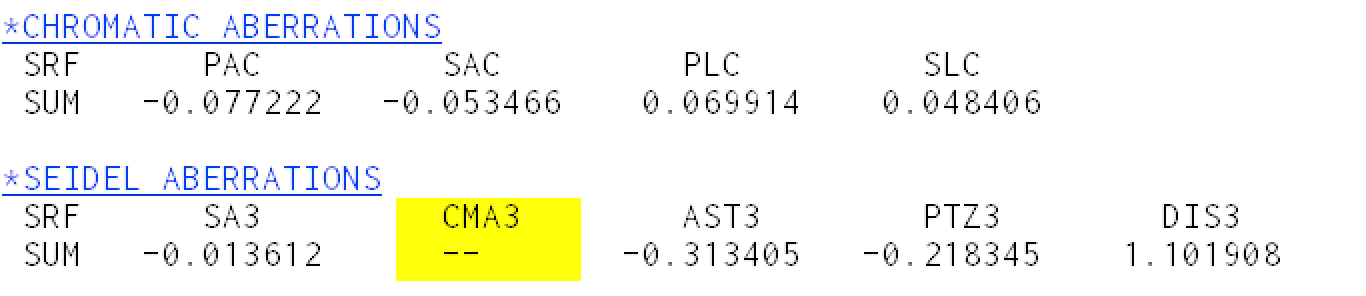
Iterating (finding the natural stop for a thick lens)
Set the THICKNESS to 4mm for the first surface
Select Optimize -> Iterate again and you should get
This is a 2mm shift from the position needed for a real lens. (This is over-explained by the shift in the principal planes located at the front vertex and 2.7mm from the rear lens vertex. So there is probably some good reason that we are using this program after all.)
Nevertheless, we check and the coma is once again neglible.
Next steps
The final OSLO lens file for the final landscape can also downloaded.
This document is also available as a Jupyter notebook as landscape2.ipynb.
© 2019 Scott Prahl